Easy Tips to Dehydrate Ground Beef
Dehydrating ground beef is an awesome way to preserve beef for your pantry, hiking, and camping trips, and to make quick meals in a jar that your family will love! Come learn how to stock your pantry with shelf-stable meat that doesn’t require a pressure canner or freeze-dryer!
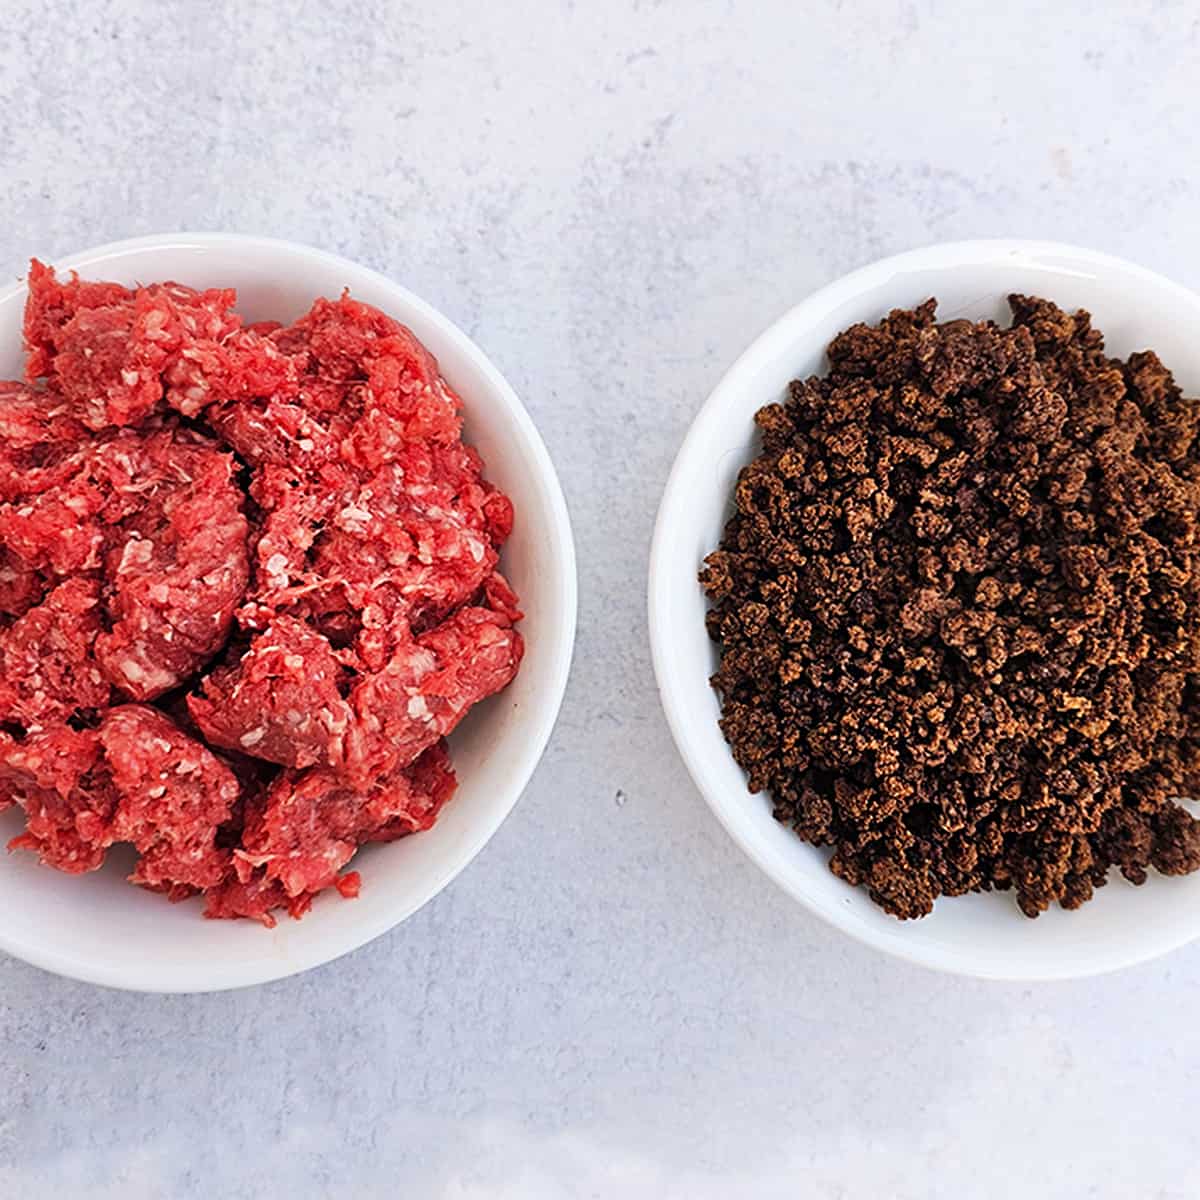
It’s a perfect way to preserve your meat for meals down the road, to make meals in a jar, or to make hiking and camping meals for your adventures.
Using lean ground meats (beef, chicken, turkey – and even sausage with extra care and storage), you can have shelf-stable meat without the fuss of a canner or the expense of a freeze dryer.
Affectionately also known as dried beef nuggets, hamburger gravel or rocks, and even beef crumbles, it’s a great way to preserve ground beef.
Any time I get ground beef on sale or find it on clearance, you can bet some is being put away as another way of storing it besides freezing and canning.
Is it Safe to Dehydrate Raw Hamburger Meat?
Yes! It is perfectly safe to dehydrate ground beef! Following the proper procedures listed below, you will have wonderfully dry dried ground beef to use in various ways!
The key is proper temperatures to kill bacteria, and to remove as much fat as possible from the meat so that it doesn’t turn rancid on the shelf.
How to Dehydrate Ground Beef
If you’re cooking ground beef for dinner tonight, brown up some extra! Just don’t add extra fats to cook to help reduce fat content in the end product.
These hamburger rocks or nuggets will help you create shelf-stable pantry storage to use for:
- Backpacking meals
- Meals in a jar to have for weeknight quick dinners or to give to friends and family who need a little hand.
- Security that you’ve got food in the pantry when needed, even if the prices skyrocket or you’ve got a tight budget that week.
Ingredients
Use lean ground beef. I use 93/7 lean ground beef, but the less fat, the better.
Pick the leanest beef you can find, or have your butcher grind some ground sirloin, ground round, or ground chuck. If you have your own Kitchen Aid grinding attachment or another manual meat grinder, you can grind your own.
Note: You can do this with ground chicken, turkey, or even sausage. The sausage tends to be fattier, so you’ll need to be more diligent about removing the fat and then storing it in the freezer for optimal results.
Equipment
- Skillet or frying pan
- Something to stir with – I really love these wooden spurtles that remind me of my grandmother’s wooden utensils.
- Food Dehydrator
- Mesh silicone sheets or parchment paper
- Colander
- Bowl
- Paper towels or newspaper (we prefer using Scott blue shop towels for this application)
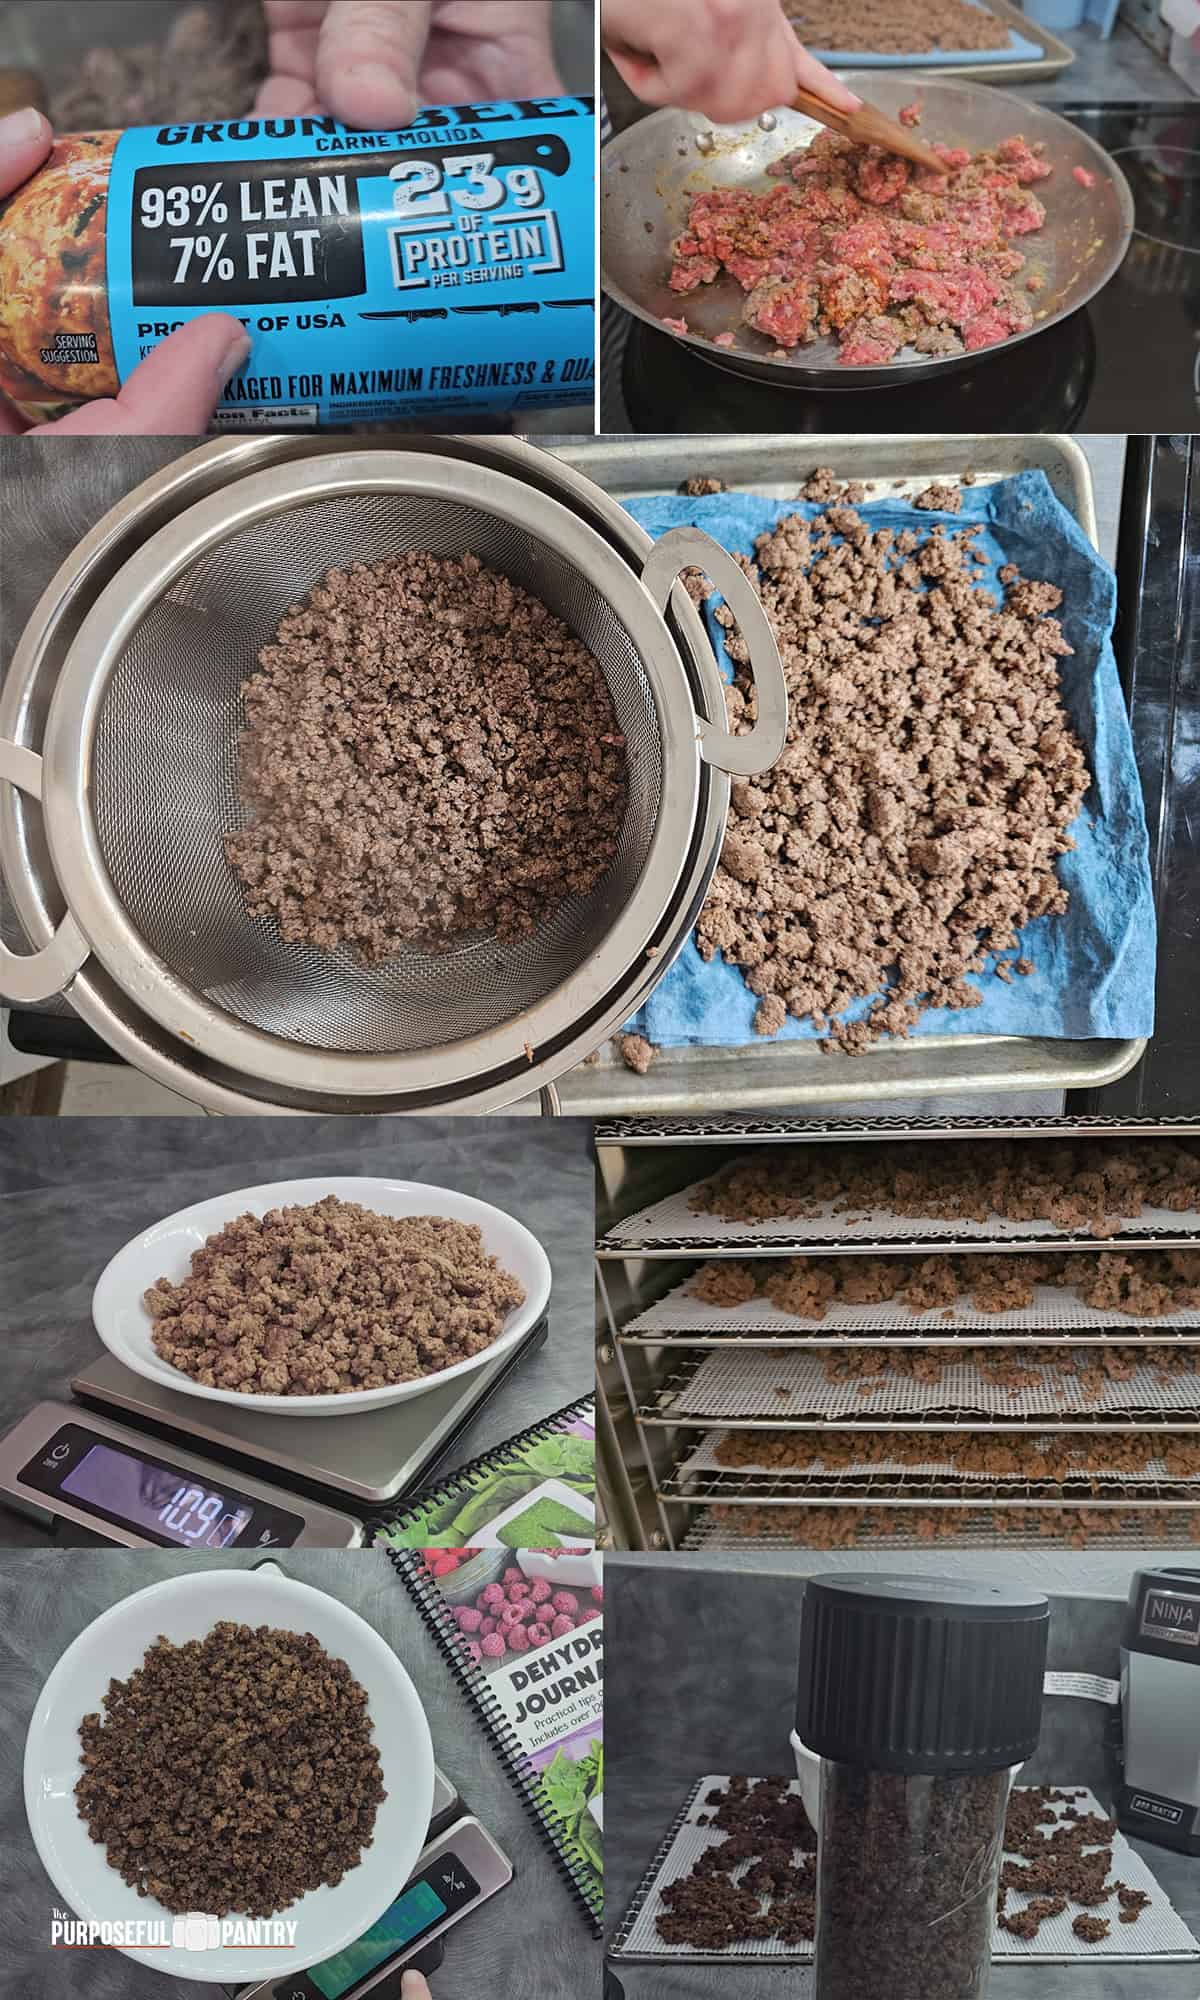
Directions
- Cook extra lean ground beef until well done over medium-high heat in your skillet or frying pan of choice. You can season the meat with salt and pepper, garlic, onion powder, or other seasonings if you prefer. I find it makes a better result.
- Drain beef in a colander over a bowl or stockpot. This helps drain any residual fat and moisture from the beef.
- Place the beef onto paper towels, old tea towels, or newspapers (most newspapers use non-petroleum inks now) to remove excess fat. I roll in the paper towels to squeeze out as much moisture and fat as possible.
- Weight meat on a scale to indicate what one serving size or pound of beef weighs once cooked.
- Place the meat onto dehydrator trays. I find using a fine-mesh sheet like these from Kispog works best to contain the small pieces of meat.
- Dry at 145°F/60°C or above for 4-10 hours. You aren’t trying to preserve nutrients at this point, so bumping up the temperature will help this go a little faster.
- If necessary, pat the beef while in the dehydrator to remove any excess fat that is released.
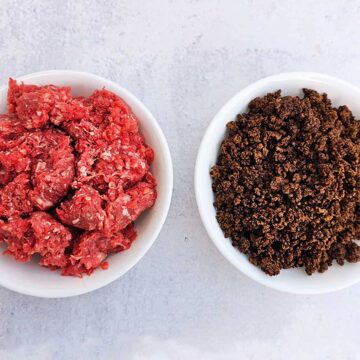
- Test for dryness (crumble easily with no obvious moisture). These will be like little hamburger pellets or crumbles.
- Weigh the ground beef portion from step 4 again to get the weight after drying. The difference is what you’ll want to use for reconstituting the dried ground beef. Make a notation of this in your dehydrating journal to have ready when you’re rehydrating.
Optional Method
Instead of browning in a skillet, try boiling ground beef in larger quantities. It helps do more, helps you reduce the fat content, and creates a great beef broth that can be used later!
Backpacker’s Secret to Dehydrating Ground Beef
While I’ve always just dehydrated ground beef, the Backpacking Chef has a great trick for making ground beef a little less pebbly in texture and rehydrates a little faster.
So I had to give his method a try! He is a great resource for dehydrating trail meals!
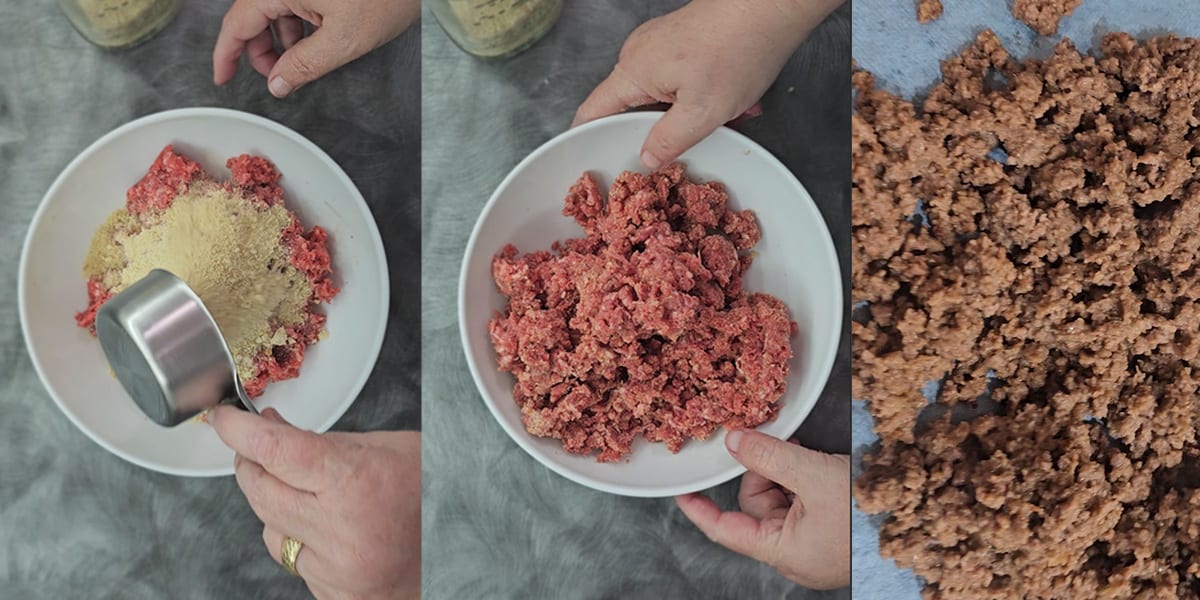
Directions
- Add 1/2 cup of dried bread crumbs to every pound of raw ground beef.
- Mix gently until well combined, but not longer. You don’t want to overwork the beef.
- Cook as normal and follow dehydrating instructions above.
Not only does this change the texture to be a little like meatloaf, but it also makes rehydrating faster!
When I tried this out, I didn’t find that the end texture was as noticeable in the taste, but it did rehydrate faster. So for home use, I will skip this step, but if I were hiking/camping, I would definitely not skip it to help make rehydration faster!
You can watch the video I did testing his method with mine on my Youtube Channel.
Oven Directions
- Prepare meat as above.
- Place cooked, drained ground beef onto parchment paper-lined baking sheets.
- Allow to dry in a 170°/72°C oven (or as low as it can go, but keep a careful eye) for 3-5 hours or until dry and crumbly.
- Pat away any fat that comes to the surface with paper towels occasionally.
- Condition
- Store in an airtight container for up to two years (but the freezer is the most optimal space).
Storage:
Store dried ground beef in an airtight container that is vacuum sealed or in a vacuum seal bag or heat sealed in a mylar bag (with or without oxygen absorbers).
Dehydrated ground beef can last up to a year or two.
A caveat: Dried meats are most reliably stored in the freezer. You can still take them out and use them for short-term hiking and camping trips or meals in a jar.
But as with all fats, warmer pantries can lead to any residual fat turning rancid, and there is no ‘timetable’ to tell you when that might happen.
So I vacuum seal in a jar, keep it on the shelf, and go through a pretty quick rotation to use them. I pop something into the freezer if I don’t think I’m going to be using it for a while to be safe.
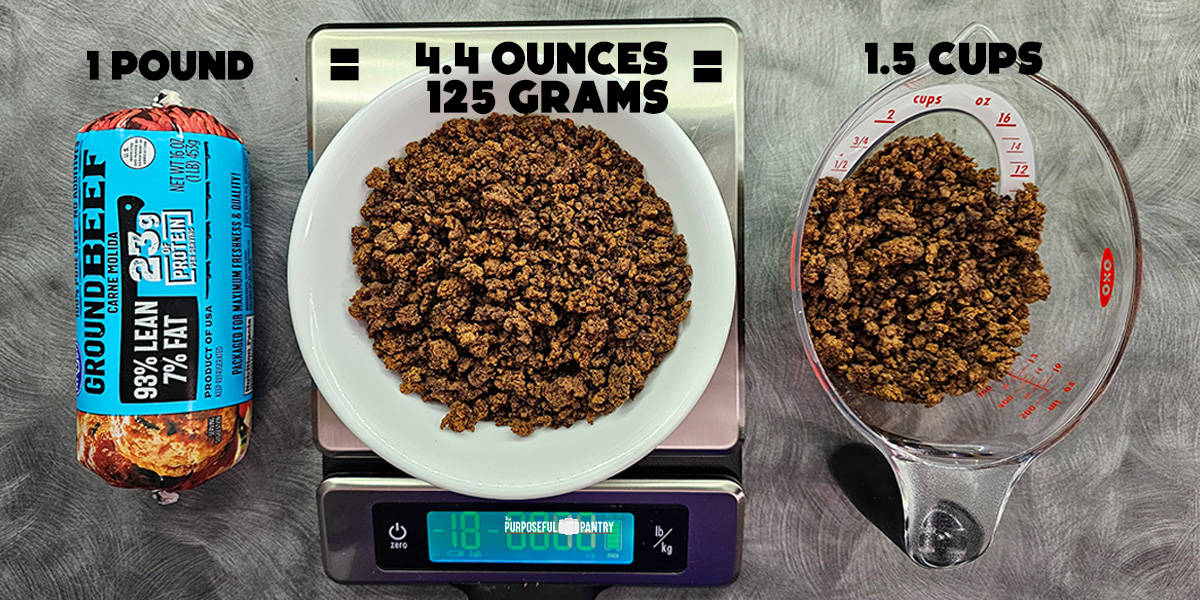
Yield:
The best means of understanding the yield of dried ground beef is:
- Cook 1 pound of ground meat (or the serving size you expect to use most often if you’re creating hiking meals for one)
- Weigh it.
- Dehydrate it
- Weigh it again.
Of course, you can measure if you prefer a volumetric measurement.
Those two measurements differ in how much water you’ll use to rehydrate.
Rehydrating Dried Ground Beef
There are two basic ways to rehydrate dried ground beef.
- Toss a serving size into your soup or stew and allow it to rehydrate in the long simmering process.
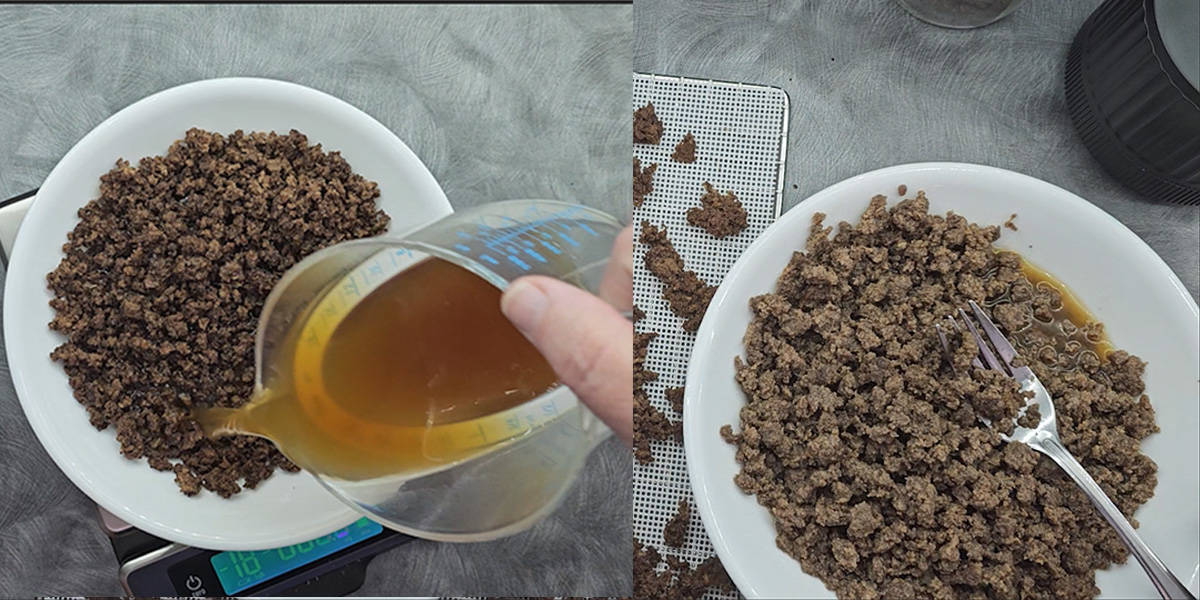
- Rehydrate in hot water or broth and steep for about 15 minutes. Placing a cover over an open bowl will help keep heat in.
I cannot emphasize enough on how broth can make the rehydrated ground beef taste better. Give it a try!
Darcy’s Tips
- Use as lean of ground beef as you can find. 90/10 or 93/10 is preferred.
- Use broth, whenever possible, to rehydrate the meat. This adds to the flavor of what many people don’t like about reconstituted ground beef.
- Season your meat when cooking. When cooking, you season the layers of all your food and do it for your meat before dehydrating it.
- If you can get minced meat, it has a less crumbly texture than ground beef.
- Don’t rinse the cooked beef in your sink. Even using hot water, fats cool pretty quickly in the drain and add to any build-up, giving you a hefty plumbing bill.
Use Dehydrated Ground Beef
Try one of these great recipes to use your dried ground beef!
Frequently Asked Questions
Yes – any lean ground meat will work for this technique.
Using the leanest kinds of meat and the above techniques will yield better results for shelf stability and prevent oxidation of the fat in the meat. You’ll likely not have a problem. However, optimal storage to prevent this is the freezer until needed for your short-term hiking and camping trips, meals in a jar, etc.
Dehydrated beef is best used within a year or two. You may see reports of it lasting up to thirty years, but over time, it can begin to lose its good texture. Freeze-dried is a better option for true long-term storage.
Use every means possible to avoid rinsing cooked beef in your kitchen sink. Use lean ground beef, use paper towels to soak up the fats. Rinsing fat in the kitchen sink can contribute to build up in your pipes that may cause plumbing issues later.
Dehydrate Ground Beef
Equipment
- Storage container
- Vacuum sealer Not necessary, but helfpul.
Ingredients
- Lean Ground Beef Ground chicken or turkey can be used as well.
Instructions
Dehydrating Instructions
- Cook beef until well done over medium high heat in your skillet or frying pan of choice. You can season the meat with salt and pepper, garlic, onion powder or other seasonings if you prefer. I find it makes a better end result.
- Drain beef in a colander over a bowl or stockpot. This helps drain any residual fat and moisture from the beef.
- Place the beef onto paper towels, old tea towels, or newspapers (most newspapers use non-petroleum inks now) to remove excess fat.
- Weight meat on a scale to get an indication of what one serving size or what one pound of beef weighs once cooked.
- Place the meat onto dehydrator trays. I find using a fine-mesh sheet like these from Kispog work best to contain the small pieces of meat.
- Dry at 145°F/60°C or above for 4-10 hours. You aren’t trying to preserve nutrients at this point, so bumping up the temperature will help this go a little faster.
- If necessary, pat the beef while in the dehydrator to remove any excess fat that is released.
- Test for dryness (crumble easily with no obvious moisture). These will be like little hamburger pellets or crumbles.
- Weigh the ground beef portion from step 4 again to get the weight after drying. The difference is what you’ll want to use for reconstituting the dried ground beef. Make a notation of this in your dehydrating journal to have ready when you’re rehydrating.
Oven Instructions
- Prepare meat as above.
- Place cooked, drained ground beef onto parchment paper-lined baking sheets.
- Allow to dry in a 170°/72°C oven (or as low as it can go, but keep a careful eye) for 3-5 hours or untl dry and crumbly.
- Pat away any fat that comes to the surface with paper towels occasionally.
- Store in an airtight container for up to two years (but the freezer is the most optimal space).
Backpacking Secret
- Add 1/2 cup of dried bread crumbs to every pound of raw ground beef.
- Mix gently until well combined, but not longer. You don't want to overwork the beef.
- Cook as normal and follow dehydrating instructions above.
Video
Darcy’s Tips
Storage:
Store in an airtight container – canning jar, vacuum seal bag, or mylar bag with an O2 absorber if you wish. While shelf-stable storage of dried ground beef is possible, the optimal storage is in the freezer until auch time as you need it for short-term hiking/camping trips or meals in a jar. You may get a few months; you may get a year. You’ll get longer the leaner the meat is to start with.Rehydrating Dried Ground Beef
There are two basic ways to rehydrate dried ground beef.-
- Toss a serving size into your soup or stew and allow it to rehydrate in the long simmering process.
-
- Rehydrate in hot water or broth and steep for about 15 minutes. Placing a cover over an open bowl will help keep heat in.
Darcy’s Tips
-
- Use as lean of ground beef as you can find. 90/10 or 93/10 is preferred.
-
- Use broth, whenever possible, to rehydrate the meat. This adds to the flavor of what many people don’t like about reconstituted ground beef.
-
- Season your meat when cooking. When cooking, you season the layers of all your food and do it for your meat before dehydrating it.
-
- If you can get minced meat, it has a less crumbly texture than ground beef.
-
- Don’t rinse the cooked beef in your sink. Even using hot water, fats cool pretty quickly in the drain and add to any build-up, giving you a hefty plumbing bill.
Nutrition
Nutritional information is an estimation only. Nutrient information for dehydrated foods is based on fresh. Use 1/4 of the servicing size for the same nutrient information. Thus 1 Cup of fresh fruit has the same sugars as 1/4 dried.
©ThePurposefulPantry. Photographs and content are copyright protected. Sharing of this recipe’s link is both encouraged and appreciated. Copying and/or pasting full recipes to any social media is strictly prohibited.


Could you dehydrate the beef and grind for like a bullion powder?
Sure – but it’s still not reliably shelf-stable and would need to be kept in the fridge/freezer for optimal storage.
Have you ever dehydrated ground venison that doesn’t have any fat in it?
No, but it would work – just test how it rehydrates to see if you like it.